


Samples for Hematology
General Information
In general, hematology testing is performed on EDTA- (purple top tube) anticoagulated blood. This is the only type of anticoagulant that can be assayed with our hematology analyzer, therefore all hematology tests performed with this analyzer (routine hemograms, red and white cell counts, etc) will only be done from EDTA tubes. Heparin (green top tube) is not recommended as an anticoagulant for cell counts, because the cells clump in heparin, invalidating counts. Citrate (blue top tube) is not recommended due to the dilution of the blood by the liquid citrate. These guidelines should be followed for collecting blood for hematology tests:
- A full EDTA tube should be submitted. Partially filled EDTA tubes affect the cells because EDTA is hypertonic (e.g. echinocytes will form in underfilled EDTA tubes and red cells shrink, decreasing the mean cell volume and increasing the mean cell corpuscular hemoglobin concentration). EDTA tubes should ideally be more than half full.
- Ensure that the blood is mixed promptly with the EDTA to avoid sample clotting. This is especially pertinent with Microtainer® tubes. This should be done by rolling the tube between your palms or gentle inversion several times. Do not shake the tube!
- Microtainer® tubes should be avoided. If only a small amount of blood can be collected, e.g. from a young dog or cat, or very sick animals in which multiple, sequential samples are going to be collected, the blood should be collected into a Microtainer® tube. The tube should be full. Full Microtainer® tubes are required, because if we have too little blood, we may not be able to perform other tests that may be required, e.g. diluting the sample, checking counts etc.
- The tubes should be labeled with the patient identification and owner name at the minimum. A request form with pertinent history details should be submitted concurrently with the sample, e.g. dog administered oxyglobin.
-
If there is going to be a delay between sample collection and submission, always make 2-3 blood smears from the sample and submit with the EDTA tube (see making a blood smear below).
- Smears should be submitted unfixed, unstained, with the EDTA blood for any hemogram or test involving counts or blood smear examination. We do not charge any extra for these blood smears, and we always (provided smear quality is sufficient) do our blood smear examination from the submitted smears.
- We request these smears because changes occur in cells when they are stored for more than a few hours. Platelets begin to clump, white cells become pyknotic and undergo nuclear swelling so that many neutrophils look like bands when they actually are not. The red cells may lyse. Red cells also consistently swell in vitro, such that old samples (usually > 24 hours) have macrocytic hypochromic red blood cells.
- Some hematology samples, e.g. packed cell volume and total protein by refractometer, can be performed on heparin or citrate anticoagulants. We can also perform cell counts on these anticoagulants, however this will only be done on specific research samples or on individual patients, after consultation with the Clinical pathologist on duty. In these cases, our automated hematology analyzer will not be used for counts; instead we will use bench methods, including an impedance-based cell counter for white and red cell counts and a hemocytometer for manual leukocyte or platelet counts. Note that for a fecal occult blood, we need feces, not blood!
- EDTA blood should be kept refrigerated until submission or mailing and should be mailed on a cold pack, but should be kept out of direct contact with the pack (insert paper towels between the blood and the icepack). Direct contact may cause freezing of red cells, with subsequent hemolysis. Furthermore, blood smears should not be refrigerated (causes cell lysis) or exposed to formalin (alters staining characteristics).
Making a blood smear
When there is going to be a delay between sample collection and submission, e.g. samples shipped to the laboratory or collected after hours, always make 2-3 peripheral blood smears. We have provided tips and an illustration for making a good blood smear below.
Tips for making a good blood smear
- Clean slides: It is imperative to use clean high-quality glass slides with clean edges. Touching the edges of the spreader slide will affect the quality of the smear.
- The size of the drop: If the drop is too large, the smear will be too long and thick. A small drop may not be fully representative of the blood.
- Speed of spreading action: The speed at which the spreader slide is moved is very important. If you move it too fast, the smear is too short and all the cells are at the feathered edge. If you go too slow, the smear is too long (lacks a feathered edge).
- Angle of the spreader slide: The angle determines the length of the smear. An angle of approximately 30-40° is optimal. If you use a larger angle (45°), the smear is very short. If you use a lower angle, the smear will be too long. Maintain this angle through the duration of the spreading action.
- Even contact: Even contact between the two slides is essential throughout the smear preparation process – do not add much downward pressure onto the spreader (top) slide.
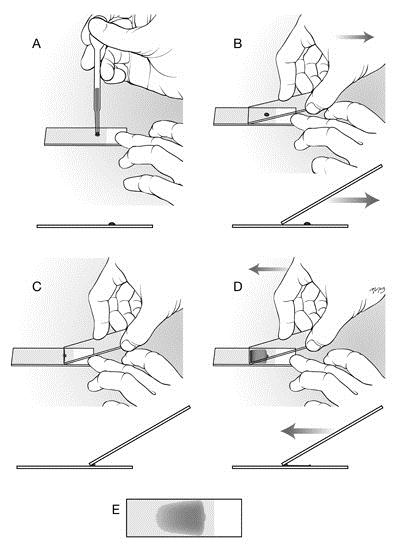
Illustration on how to make a peripheral blood smear (wedge smear).
A: Use clean slides with a frosted end. Place a drop of blood on this slide as follows (we recommend the use of a microhematocrit or capillary tube rather than the pipette shown in the image). Fill a capillary tube at least 3/4 full with well-mixed blood; then hold your finger over one end to prevent it flowing out. Holding the tube horizontally over the slide, release the pressure of your finger from the end, and tilt the tube slightly toward the vertical to allow a controlled amount of blood to flow out of the tube and onto the slide. Place a drop of blood approximately 4 mm in diameter on the slide, approximately 0.5 cm from the frosted area.
B: Pick up a second clean slide and hold it by placing your first two or three fingers on one edge of the slide and your thumb on the opposite edge; the slide in your hand is the spreader slide. Do not touch the spreading edge (short non-frosted end) with your hands. Place the spreading end of the spreader slide at a 30–40 degree angle on the slide in front of the blood droplet. The entire short edge of the spreader slide should be in complete even contact with the lower slide. Using your other hand, pin the lower slide to the countertop to prevent it moving. In one smooth motion, draw the spreader slide back through the entire drop of blood (C).
C and D: Once the blood spreads along the edge of the spreader slide (this occurs quickly), push the blood forward along the length of the lower slide. It is very important to relax your wrist and maintain a constant smooth motion and the same angle for the spreader slide when spreading the drop of blood as well as consistently even contact (with very slight downward pressure) between the two slides.
E: If the drop size and speed/angle of the spreader slide are correct, you will run out of blood before reaching the end of the slide, thus producing a “feathered edge” and a smear that is no more extends no more than ¾ along the length of the slide. If your smears do not look like the example shown above, look at the table below to identify the fault(s) and the cure(s).
Common blood smear faults and their cures
|
FAULT |
CURE |
|
Smear too short or small |
Use a larger drop of blood and/or Decrease the angle of the spreader slide and/or Decrease the speed of the spreader slide. |
|
Smear too long, extends to end of slide with no feathered edge |
Use a smaller drop of blood and/or Increase the angle of the spreader slide and/or Increase the speed of the spreader slide. |
|
Smear has waves and ridges |
Relax the wrist holding the spreader slide (too much downward force causes the spreader slide to skip) and/or Increase the speed of the spreader slide. Maintain even contact between the two slides and a smooth motion while pushing the blood forward
|
|
Only part of the drop was picked up by the spreader slide |
Draw spreader slide completely back through the drop before pushing forward. If one side of the drop was left behind, the edge of the spreader slide was not in contact with the stationary slide - relax the wrist holding the spreader slide. |
|
Smear too thick |
Use a smaller drop of blood and/or Decrease the angle of the spreader slide and/or Increase the speed of the spreader slide. |
|
Smear too thin |
Use a larger drop of blood and/or Increase the angle of the spreader slide and/or Decrease the speed of the spreader slide. |
Clotted samples
If blood has clotted in the EDTA tube, the sample will not be analyzed. Clotting affects our automated hematology analyzer adversely and also invalidates cell counts in an unpredictable fashion. For CUHA, we make every effort to notify the clinician/technician/student that a sample has clotted so that a new sample can be drawn from that patient. Furthermore, as soon as we know the sample is clotted, the test is cancelled in the computer. For samples submitted through the Samples for Hematology, we cancel hemograms or tests involving counts if the sample is clotted. However, if a blood smear is provided with the sample, we will add on a blood smear examination, which can provide valuable information.
Non-mammalian samples
Only small amounts of blood can be collected from these species, necessitating the use of Microtainer® tubes. Similar to mammals, EDTA is the preferred anticoagulant for non-mammalian hematology. However, there are certain species of birds, e.g. cranes, and reptiles, e.g. turtles, whose blood hemolyzes on contact with EDTA. This hemolysis invalidates the PCV and affects assessment of red blood cell morphology during blood smear examination. For these species, blood can be collected directly from the needle into citrate anticoagulant. However, the correct citrate to blood ratio must be maintained, i.e. 1 part citrate to 9 parts blood. Ideally, the citrate should be placed into the syringe and the appropriate volume of blood withdrawn directly into anticoagulant. For example, to collect 1 ml blood, 0.1 ml citrate is placed into a syringe and 0.9 ml of blood is taken from the patient (collect blood up to the 1 ml mark). If less blood is collected, you will have to resample, hence make sure you can obtain the correct amount of blood. We require at least 500 µL of blood for performing a hemogram, hence you can collect only this amount of blood, which is achievable in most non-mammalian patients. The correct amount of citrate to blood must be maintained because citrate dilutes the blood; this dilution must be corrected for when evaluating the hemogram (i.e. each value should be multiplied by 1.1 for a 1:9 citrate:blood ratio). We do not make this correction in our reports. Heparin is not recommended as an anticoagulant because leukocytes and thrombocytes clump, invalidating WBC counts and differential cell counts.
Samples for Coagulation Tests
As of September 1, 2001, the Clinical Pathology Lab will no longer be performing coagulation tests; these tests will instead be offered exclusively by the Comparative Coagulation Laboratory in the Diagnostic Lab at Cornell University. The Clinical Pathology lab will continue to offer the Fibrinogen by Heat Precipitation test.
| Test | Components | Specimen | Comments |
| Fibrinogen by Heat Precipitation | FIB | EDTA tube (>1/2 full) | Large animals only |
This is performed on EDTA blood only (lavender top tube). Fibrinogen is quite stable, although hemolysis and lipemia will interfere with the test.
Microtainer® is a registered trademark of Becton, Dickinson and Company.